Thursday, November 8, 2012

Daniel in the lion's den

I did another set of Bible story finger puppets - Daniel in the lion's den! It's always a favorite, and such a fun one to have puppets for.


I decided to test out the puppets with my two-year-old today to see how he liked them. So I told him about how Daniel prayed, and the king put him in the den of lions, and Daniel was scared the lions would eat him so he prayed and was safe. What did my toddler get out of it? "Lions eat him!" Hmm... I think I might need to tell it a little differently. (see Daniel chapter 6 for the full story) :)


 The king, Daniel, an angel, and two lions


I'm working on a bunch of new sets that I'm trying to get finished and listed for Christmas sales, so look forward to (hopefully) lots more posts and lots more puppets!

Wednesday, November 7, 2012

thanksgiving puppets

A few weeks ago I started on some Thanksgiving finger puppets. I was feeling so ahead of things! But of course I didn't finish them when I started them, and realized the other day that if I didn't get them finished and listed in the shop soon, I might as well just wait until next year! So I actually got them finished and listed.

Pilgrims, a turkey, and Native Americans Thanksgiving finger puppet set

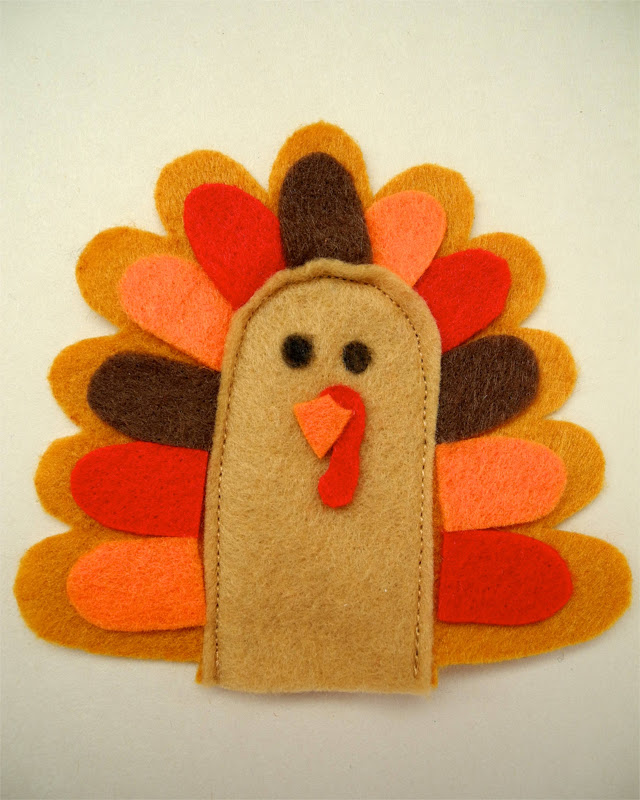
I love the way this little turkey turned out. The colors are just so fall! I also love that my two-year-old runs around saying "gob-gobbo" whenever we talk about turkeys.

Native American finger puppets. (Is it ok to call them Indians? Is that offensive, or just not PC? I never know with these things...) I actually braided the felt for the girl's hair. I think that's my favorite thing about her.

Pilgrim finger puppets, with a buckle on the hat for the boy and apron and bonnet for the girl.


The whole set

I'm getting so excited for Thanksgiving! I absolutely love making pies. I might have to start trying out a few recipes now to decide which ones to make for the big day... :)


Tuesday, November 6, 2012

green hummus

Have any of you seen the Brian Regan bit about how cranberries are getting into everything? Well, first of all, it's pretty funny, and second, I'm kinda feeling that way about spinach. But you know, I'm ok with spinach getting into everything. It's so good for you, and it's one of the few vegetables I can sneak into my two-year-old's diet.

So I came up with another way to sneak in some spinach this week: Green Hummus.


And it was actually really tasty, really healthy, really easy to make, and my little guy gobbled up his "green sauce" and asked for more!

One of the reasons I decided to experiment a bit with food this past week is that we took Jack off dairy to see if that was the cause of some tummy troubles. And let me tell you, taking a kid off diary whose favorite food is cheese is quite a task! I had to get pretty creative, especially getting protein and calcium into him. Hence the green hummus.

One other thing that's nice about this recipe - in addition to being very healthy and fresh, it's also dairy-free, gluten-free, and soy-free, which I know is a big issue for a lot of people.

I looked at a few different hummus recipes, and then (as my mom constantly teases me for) mostly ignored them and came up with my own recipe. So here it is!

Green Hummus

Ingredients:
1 can chickpeas (garbanzo beans)
2 Tbsp lime juice
2 Tbsp tahini
1 Tbsp olive oil
1 tsp cumin
1-2 cups spinach leaves
salt and pepper to taste
water (if needed)

1. Place all ingredients in a food processor. (I didn't measure the spinach, I basically just filled the rest of the food processor with as much as would fit.)


2. Blend all ingredients until smooth, stopping and scraping down the sides as needed. If it seems too thick, add a little water for a smoother consistency.


3. Serve with pita chips, crackers, vegetables, etc.


You could also add roasted red peppers, sundried tomatoes, or fresh cilantro for a little variety.


Update: I recently decided to start a separate blog for recipes and food/cooking tips. You can see this hummus recipe and a whole lot more over at Modern Mommy's Kitchen!


Monday, November 5, 2012

tricksy little hobbitses

The good news is: I actually finished all of our Halloween costumes in time to wear them for Halloween! The bad news: It's hard to get good pictures of a two-year-old and three-month-old wearing their costumes. But they did look incredibly adorable, and I think we'll probably have to use these costumes again at some point because they really were pretty awesome.

So here we have Galadriel, Samwise, Frodo, and Gandalf.

Unfortunately, I couldn't find any witch hats that weren't covered in feathers and other nonsense and require too much work to make a proper Gandalf hat. And I certainly didn't have time to make an actual hat. So that meant that everyone thought my husband was Moses. Costume FAIL. But really, if you look at all of us together, it's pretty obvious who he is. Right? Right? Apparently these costumes were about a decade too late. Or we just live somewhere with people who clearly aren't awesome enough to appreciate LOTR.

Little Frodo ready to go trick-or-treating.  He looks so happy about it! (He was actually incredibly excited about trick-or-treating, just much less excited about taking pictures.)

I managed to make all four of our costumes for about $35, which considering how complex some of them were, I think was really quite cheap.  (I probably should have spent a few more dollars and gotten Gandalf a hat...Oh well.) Here's how I made them on such a small budget:

For Frodo's costume, I made him a cloak (check out my pattern and tutorial), and a shirt and vest (from a Simplicity pattern), and he wore a pair of 9 month pants that were very much too short, but could still stretch over his skinny waist. I was able to get the felt for the cloak on sale, the fabric for the vest on sale, and use some muslin scraps from a previous project for the shirt. That's one of the nice things about making clothes for little ones - a lot of times you'll have enough fabric in scraps from other projects to make something!

I also made the "leaves of Lorien" with some leaf buttons and silver jewelry wire, and a safety pin on the back. They're pretty small, but it was ok since they were for some pretty small hobbits! I used the same wire to make my headpiece - not nearly as fancy and pretty as Galadriel's, but it worked and it was cheap!

My little hobbits! Frodo and Samwise. Looking tired post trick-or-treating

For my little Samwise, I made the same cloak just a smaller version, and made the leaf pin, and the rest was clothes we already had. He just wore an off-white onesie, brown pants, and an old vest of Jack's that I took in a bit because it was way too big.

For Galadriel, I stole my sister's old angel costume. It was HUGE! So I did what I could to take it in a bit, altered the neck line, added a lace applique, and and found a lace ribbon to tie around my waist so it wouldn't be completely enormous. Oh, and I already mentioned the headpiece, but I also used the silver wire to turn a pretty flower button into Galadriel's ring.


Extra bonus: When I bought the buttons, they were buy one get one free, so the leaf buttons were free!

I actually spent more on the gray fabric for Gandalf's robe than on any other one item. The fabric was actually on sale, I just needed a lot of it! My husband is rather tall... But then we borrowed the wig and beard from his dad, who has a Santa costume, so that was free!  

So here are the keys to doing awesome Halloween costumes cheaply:
1. Use clothes/costumes you already have and just alter them if needed
2. Use scrap fabric
3. Shop sales
4. Borrow things

Some day I hope to have enough money to make more authentic and elaborate costumes... but until then, I think we did pretty well with these!

Hope you all had a wonderful Halloween!! 


Monday, October 29, 2012

Halloween Cookies

Have I mentioned that I love Halloween? Cuz I do! The costumes are all done (except my husband's...), and we're carving pumpkins tonight! We took the boys to this huge Halloween party at a local shopping center on Saturday, and had lots of fun.

We also made some Halloween cookies!  Jack loved it! He always likes to "help" Mommy cook. Mostly he wanted to steal the cookies and chocolate chips... But he was incredibly cute telling me that the Jack-o-lantern cookies were for Jack, and the mummy cookies were for Mommy.


Here's what you'll need if you want to make these cute and easy Halloween treats:

Oreos
Wilton candy melts in orange, green, and white (or white chocolate chips and food coloring)
Mini chocolate chips
Regular chocolate chips
Red hots/cinnamon imperials
Plastic sandwich bags
Wax paper

Line a cookie sheet with wax paper, or just lay it out on your counter so it's ready for the cookies.

To make the Jack-o-lanterns:
1. Melt the orange candy melts in a bowl.  A whole package is about enough for a whole package of Oreos. I usually do about 30 seconds in the microwave, stir, and then a little more to finish melting.

2. Dip Oreos into the orange candy, coating as evenly as possible. Let some of the candy drip off, then lay it on the wax paper. If there's a spot where you were holding the cookie that didn't really get covered, just drip a little off a spoon.

3. Use mini chocolate chips to make a Jack-o-lantern face. Make sure the orange coating doesn't set too much before you do this, or the chips won't stick. I'd recommend either assigning one person to dip and one to do faces, or just dip a few at a time.

4. Melt a few green candies in a ziploc bag. Just leave the bag open, microwave it for 20-30 seconds, then knead the melted candies. If they're not melted enough, put them back in the microwave for a few more seconds.

5. Knead the melted candy down to one corner of the bag, and cut the tip off the corner. Be sure to cut just a small opening!

6. Pipe the melted green onto the top of the jack-o-lanterns to make a stem, leaf, and curly vine. Or any combination of those.

Jack-o-lanterns complete! Just let them sit for a little while so the candy sets.

To make the mummies:
1. Lay out Oreos on the wax paper. Place regular size chocolate chips in the center of the Oreos for the eyes.

2. Melt the white candy in a ziploc bag (see #4 above). Knead the melted candy down to one corner. Cut the tip of the bag. This one you should cut a little bigger than the green, but not too big!

3. Pipe white candy over Oreos, partially covering chocolate chip eyes. Be sure to pipe in several directions so it looks like overlapping bandages.

4. Let them set for a little while, and then break off the pieces of white candy that got drizzled past the edges of the cookie. (See how messy they look in the picture above compared to the one below?)

Mummy cookies are done! If you don't like that some of the Oreo shows through, you could dip them in white first, then add the eyes and pipe on the bandages.

To make the monsters:
1. Melt green candy in a bowl. (See #1 on making the jack-o-lanterns)

2. Dip Oreos into the melted green candy. (See #2 on the jack-o-lanterns)

3. Place mini chocolate chips along the top edge of the cookie to make spiky hair. Place two red hots/cinnamon imperials in the middle for the eyes. Use mini chocolate chips or one regular chocolate chip (I put them pointy-side-down) for the mouth.


Monster cookies finished! Just let them sit until the candy is set up.

Now all you need is a glass of milk!  I thought of doing a few other Halloween-themed Oreos, but didn't get the chance. What other monsters and such would you make with Oreos (or other cookies)?


Update: I recently decided to start a separate blog for recipes and food/cooking tips and ideas. You can see more ideas like this over at Modern Mommy's Kitchen!

Wednesday, October 24, 2012

easy baby or toddler cloak

I am so excited for Halloween! I've always loved it, but it's even more fun now with kids. Especially now that Jack is getting old enough to start getting excited about and understanding holidays. And what's better than dressing up a little kid in an awesome costume? Dressing up TWO kids in awesome costumes!

So let's just say I've been more than a little excited for our family's Halloween costumes this year ever since I came up with the brilliant idea a few months ago. And since I came up with the idea a few months ago, I should be long done with all the costumes, right? Of course not! But I am making pretty good progress.

The first items to be finished were the hooded cloaks for the boys. After looking at (and even purchasing) several patterns, and deciding I didn't like any of them, I made my own, which ended up being way better and easier and anyway. So here I present to you:

(These aren't their full costumes... Also, what's harder than taking a picture of one kid? Taking a picture of TWO kids!)
The Super Simple Baby/Toddler Cloak

What you need:
- Felt* (approx 1 yard of 72" felt)
- 1/2" ribbon (about a yard to be safe)
- thread
- fabric marker
- typical sewing supplies (scissors, tape measure, pins, etc.)

*You could use other fabric, but I like felt for a few reasons - 1. It's cheap 2. It's warm (and sometimes it's pretty cold on Halloween!) 3. You don't have to finish the edges. And I'm lazy.

1. Determine how long you need the cloak to be. Measure from the top of the child's shoulder to the desired length of the cloak. (When in doubt, go a little long - you can always cut some off the bottom later.) Now add 3" for a baby, 6" for a toddler. (This allows you to cut out around the neck and maintain the desired length.) For my baby, I wanted the cloak to be 15" long, so my magic number was 18". For my toddler, it was 36" - perfect for 72" felt! (In fact, if your magic number is any bigger than 36, you'll need more than a yard of fabric.)

2. You're going to cut out a half circle from your felt. Lay out the felt on a flat surface, and mark the center point with a fabric marker. Now use a tape measure and measure straight out along the edge of the fabric the number of inches you calculated in step 1. Repeat on the other side of the center mark. Now measure and mark straight out at 90 degree angle. Think of your tape measure as a protractor, and continue moving and marking so you have a dashed line marking out a half circle.


3. Using the same center point, you will now mark the neck line. For a baby cloak, measure out about 3". For a toddler cloak, measure out about 6". Measure and mark just as you did in step 2. (You can adjust this as needed, just remember this was the number you added to your length measurement in step 1.)

4. Cut along the outer dashed line, then cut along the inner line. You now have the main piece of your cloak!

5. Cut out two pieces for the hood. You can use my pattern below, or adapt it to your own size and liking. (I adapted it from one of the patterns I bought. That pattern made an absolutely enormous hood! So I used the basic shape/dimensions and scaled it down a bit.)


(To adjust size, just add on or cut back the center back seam. For example, just measure out 1" all the way around the center back seam to make it bigger.)

6. With right sides together, stitch the two hood pieces together along the outer curved edge, forming a seam up the middle of the hood. You can either clip the extra fabric from the seam allowance at the front of the hood, or fold it back and tack/stitch it in place.


7. Time to attach the hood to the cloak! With right sides together, line up the center seam of the hood with the mid point of the neckline. Pin it.

8. Now continue pinning each side of the hood, creating pleats as you go to make the hood line up nicely with the curve of the neckline. I did two pleats in the baby cloak, three in the toddler cloak. The hood should not come all the way to the front of the cloak. It should end 1-2" back from the front edge.


(You can also see the pleats in the previous picture for step 6)

9. Stitch the hood to the cloak.

10. Cut two lengths of ribbon, each at least 12" long. (Better to be too long and trim them later!) Pin them to the inside edge of the front of the cloak, just below where the hood meets the cloak. Stitch along the ribbon to secure it to the cloak.


11. Try it on your little one, see if you need to cut any length off the bottom, and you're done! (If you want a more finished look, you can stitch around the front edges of the hood and cloak, and the hem.)

The finished product, looking slightly creepy without a little person in it!

Baby cloak! And of course he's making his awesome gnome face. I was just glad to get a picture in which he wasn't trying to eat the cloak.

Toddler cloak! In typical toddler fashion, he was throwing a tantrum about wearing the cloak and taking pictures. He kept crying "Jack come out!" (meaning out of the cloak...) This was the best I could get.


Friday, October 12, 2012

the 12 apostles

I just finished up a fun custom order for finger puppets of Jesus with all 12 apostles.  I have a set in my shop with Jesus and a few of the apostles, so I started with those and then designed and made a whole bunch more!
(This is the set already in my shop)

It was fun,  though slightly challenging to come up with 12 different puppets wearing Biblical-looking clothes in neutral colors.  There are only so many neutral colors of felt, and so many combinations, before you start feeling like they're all going to look the same!  But I had three basic clothing designs, and between those, and the different colors for clothes, hair, beards, etc. I think I managed to come up with 12 unique apostle puppets.


Now I'm just trying to finish up my Thanksgiving puppet set, and our Halloween costumes!