Thursday, January 26, 2012

Valentine's hair pins

Valentine's is coming soon!  And since time has a way of slipping away from me, I decided to start some Valentine's projects a bit early so I could actually get them done before the holiday.

Here's my first round of heart-themed crafts: Valentine's hair pins.
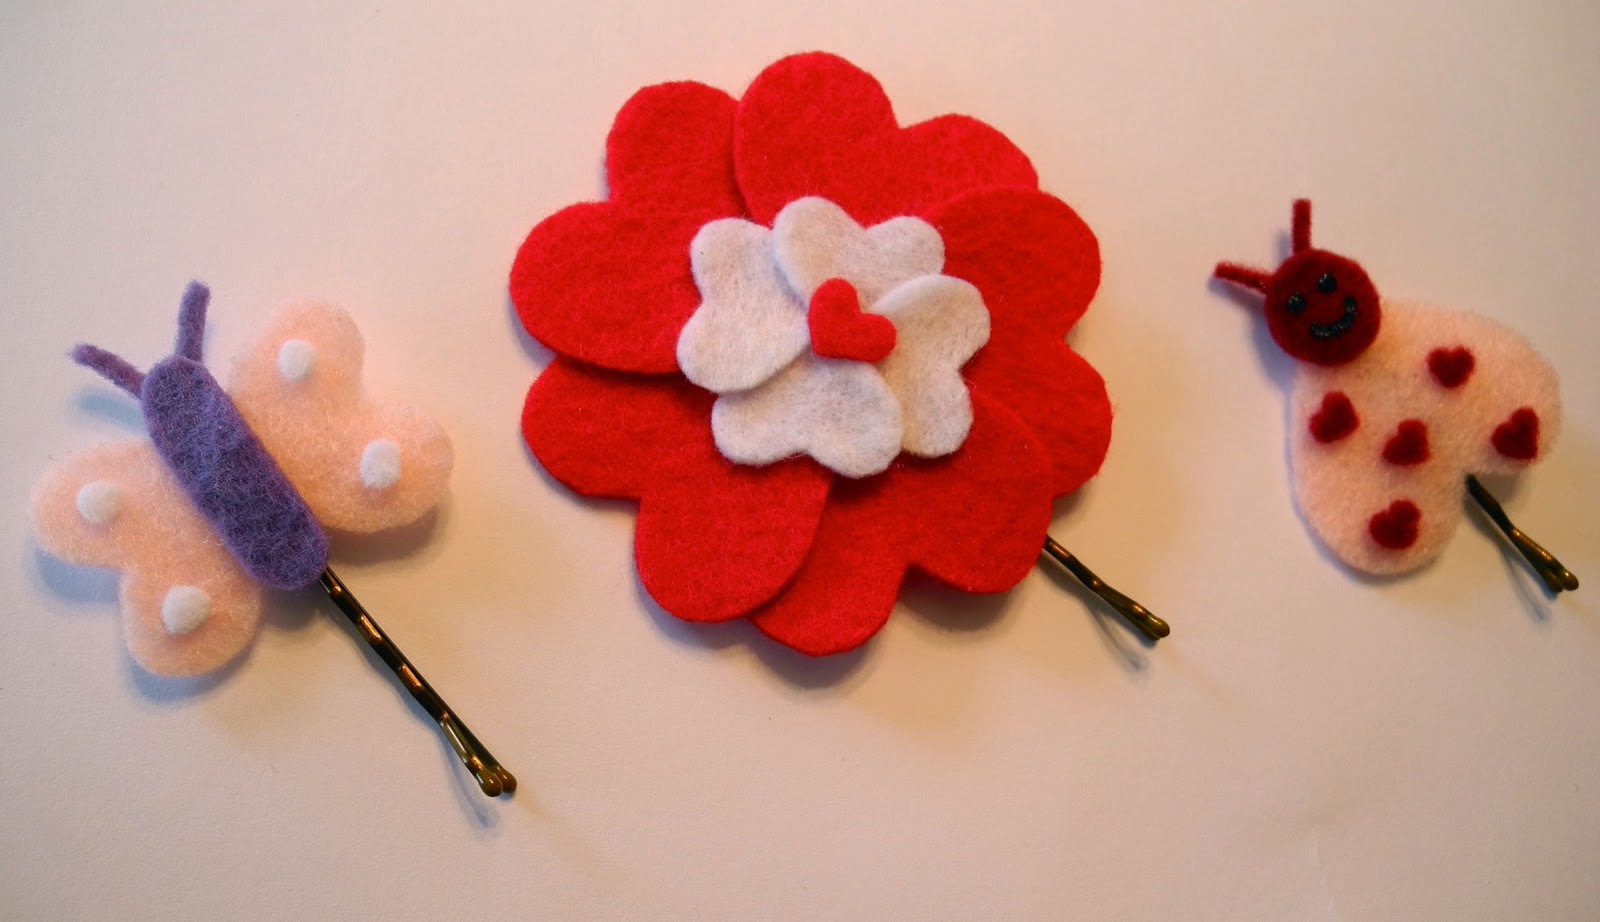
They're all made from hearts (and a few other shapes) cut out of felt.  And if you prefer headbands or barrettes, you could just as easily attach them to those instead of bobby pins.

They're also all super easy to make.  That's my favorite part.

Love Bug

What you'll need:
2 colors of felt (I used light pink and burgundy)
Black fabric paint
Craft/fabric glue
Bobby pin
Scissors
Glue

1. Cut out a heart approximately 1.5" tall and 1.5" wide (at the widest point)
2. Cut out a circle for the head (about .5" across, maybe smaller)
3. Cut out two antennae
4. Cut out five little tiny hearts


5. Glue the circle to the point of the heart to make the head.
6. Glue the antennae to the back of the head.
7. Glue the tiny hearts on the big heart.
(This picture shows the face already painted on, but I would wait until the end so you don't risk smudging it all over)

8. Cut out a little rectangle (it could be even shorter than the one shown below) and glue it to the back.  Only glue down the long sides, leaving the top and bottom (the small sides) open.  You're making a sleeve to slide the bobby pin through.

9. Slide the bobby pin through.  You can glue it in place if you want, but it stays pretty well on its own.

10. Paint on a little face, and your love bug is finished!

Heart Petal Flower

What you'll need:
2 colors of felt (I used red and white)
Scissors
Glue
Bobby pin
Erasable fabric marker
Heart "patterns"

1. Make two paper heart patterns - one approximately 1.25" tall and wide, the other approximately .5" tall and wide.  If you don't feel like making them, you could always print them or use a stencil.  The main thing is you just want all your hearts to be the same size.

2. Cut out five hearts from the larger pattern, and four from the smaller pattern in a contrasting color.
(I know there are five little hearts here.  I planned on five, but decided four looked better.)

3. Lay the big heart petals out in an overlapping pattern to form the flower.  I like to lay them all out before I start gluing to make sure I get the spacing right.

You want them all overlapping the same way so there isn't a start or end.

4. Glue the heart petals together where they overlap.

5. Lay out the smaller hearts on top in a similar overlapping pattern, and glue down.

6. Cut out a little heart for the center of the flower, and glue down.

7. Make a sleeve for the bobby pin to slide through the same way as for the love bug (a little rectangle on the back.)  Make sure if the flower has a distinct top or bottom to put the sleeve the right direction.


8. Slide the bobby pin, and you're done!


Butterfly

What you'll need:
3 colors of felt (I used pink, purple, and white)
Scissors
Glue
Bobby pin
1. Cut out two hearts, approximately 1" tall and wide
2. Cut out a rectangle about 1.25" tall, and then round off the corners.  Cut out another rectangle about half the length of the first.
3. Cut out two antennae from the same color as the rectangle.
4. Cut out little circles or hearts from the third color.

5. Glue hearts together with points overlapping.
6. Glue butterfly body over the overlapping points. 
7. Glue antennae to the back of the body.

8. Glue circles or hearts on butterfly wings.

9. Use the shorter rectangle to make a sleeve on the back to slide the bobby pin through.  Glue down both long sides, leaving the top and bottom open for the bobby pin.


Ta Da!


Sorry I don't have any pictures of them actually in someone's hair.  My hair wasn't looking especially lovely today, and I don't think using my son as a model for these would turn out very well!  But I did try them in my own hair, and they certainly would be cute if I had actually done my hair!  And if I was a little girl...  :)


Tuesday, January 24, 2012

furry friends

I've been working on lots of animal puppets lately.  A Noah's Ark set, a farm set, a whole army of elephants (more on that later) and various others.  Some are still in the designing phase - just not quite sure how to make some of them actually look like the animal they're supposed to be... But a lot of them I think have turned out pretty well!

So introducing a few of my new furry friends:

 Noah, Mrs. Noah, the ark, and some of the animals they took along for the ride.

 Old McDonald and a few of his farm animals with their barn

Okay, I know these sets have people too, but they're mostly animals.  And I think you can even tell what most of them are!  That's what I'm mostly proud of.  :)  It was fun coming up with the little details - like pink noses and eyelashes for the girls on Noah's Ark, or the curly tail on the back of the pig (sorry, no pictures), or the little cow bell on Bessy.

When I first started on my Noah's Ark set, I somehow forgot about the animals coming in pairs... How I forgot that part, I have no idea. But I made one of each animal, then looked at my handy work, and knew something was missing.  All the girl animals!  What would Noah have done if he'd been like me and only remembered one of each?  Disastrous.  Good thing I wasn't in charge.


I'm also working on some sets for Bible stories and some classic children's stories.  Any recommendations?

Oh, and both of these sets are available in my shop.  More coming soon!

Thursday, January 12, 2012

pirate party

I decided to pull something out of my archives for today's post - Jack's 1st birthday party!  It was a pirate party.  How could it not be?  After all, my husband's primary motive in deciding on a name was "what will make the best pirate name?"  (I'm serious.)  Thankfully he didn't take my sister's suggestion of Blackbeard.

We didn't go all out like some parents, and in fact only invited the grandparents and my sister.  But I did still go a little overboard (get it?) and make a baby size pirate ship for him to sit in for pictures.

But he didn't really want to sit in it.  He wanted to climb in and out of it.  At least it looks like he's saying "arr!"  And yes, his shirt is a treasure map.

He also didn't want to wear his pirate hat.

He did like the "treasure" we gave him, and kept throwing it all overboard.

This one's pretty good!  And you can see most of the ship in this one, it's just a little washed out because the sun was shining in behind the butcher paper.  But you get the idea.

So here's what you need to make a pirate ship and the ocean/sky backdrop:

2 laundry baskets
a big piece of cardboard (wider than the laundry baskets, and at least as tall)
pencil
black marker
a broom handle or long dowel
butcher paper in blue (2 shades), white, and red (or other color)
masking or packing tape

box cutter and/or x-acto knife

Turn one laundry basket upside down, then place the other on top of it.  I'd recommend taping them together so they don't slide around.

Draw the outline of the pirate ship onto the cardboard, and cut it out.

Draw windows, portholes, etc. on the side of the ship.

Attach the ship to the top laundry basket.

Cut the 2 pieces of the darker blue butcher paper so it looks like waves across the top.  Both pieces should be about the height and width of the bottom laundry basket.  (A little taller is good, just to be safe.)  Attach one piece in front of the ship.  Save the other for the backdrop.

Cut out a piece of white butcher paper for the sail, and attach it to the dowel, leaving about 12" at the top. Cut out a flag from the red piece, and attach it to the top of the dowel.  Now tape the dowel to the laundry basket - inside if it's short enough, outside if you're using something longer like a broom handle.

Now just put up the piece of light blue "sky" and attach the second ocean piece to the bottom, and you have your backdrop!  Set your ship in front of it, and it's ready for some great photos!

If you're feeling really creative you could even draw some seagulls or cut out some clouds for the sky, or make the sail have a skull and crossbones... I ran out of time.


You might be thinking, "really?  tape?  you used tape?"  It does seem kind of lame.  But my main reason was that I wanted to be able to disassemble it easily and re-use all the pieces - either for a pirate ship again, or other projects.  Plus it made it really fast and easy to assemble in the first place!

And what's a first birthday party without a cake for the birthday boy?


He loved it.


Tuesday, January 10, 2012

date night fail

Lately I've seen lots of posts/pins/blogs about date nights.  Ideas for date nights with your spouse, how important it is, 52 dates (one per week), pre-paid date night baskets, etc. So I got to thinking that my husband and I should try to do a little more than just watch a movie on our couch like we so often do.

Around Thanksgiving we talked about it, and decided that we would take turns planning date nights every Friday night to try to mix things up a bit.  We had a few successful weeks - game night, baking cookies, going out to dinner with some friends - but then we had all sorts of family things for the holidays.  So for the new year, I decided we should have renewed commitment!

Want to know how our first "date night" of the year went?  Miserably.  Literally.

Why?  We both had food poisoning.  Talk about killing the mood.  Instead of butterflies it felt like lumps of lead in my stomach.  And nothing says romance like nausea.  Oh wait...

Luckily my wonderful mother was there to help out with Jack, and to make us some dinner when we finally felt like eating.


I had chicken noodle soup (like a normal sick person)


And my husband had bacon and eggs with hot sauce!  (he's crazy)

So after that epic fail at a date night, here's to hoping this week's goes a little better.  But here's the other problem.  Most of the blogs I've looked at for ideas all have ideas that are really cutesy and cheesy.  Two things my husband does not go for (and I often agree).   I think my husband would refuse to ever go on a date again if I tried something like leaving him a trail of love notes with clues to the next one.  (Can't tell you how many variations on this I've seen on blogs about dating...)  So I'm left trying to come up with ideas on my own. Anyone have any good suggestions?

Maybe we'll just watch a movie.

Wednesday, January 4, 2012

how (not) to make Mike Wazowski...

This post is kind of a tutorial... maybe an anti-tutorial?  Mostly I hope you learn from my mistakes, or are just smarter than me to begin with!  While the Mike Wazowski I made for Jack for Christmas turned out pretty well in the end, it was a long road getting there...

So here are some tips that apply to sewing in general, and some specifically to this project.

Tip #1: Don't try to hurry!  If you do, it will just take you way longer than it would have if you'd been slow and careful to begin with.

I was trying to hurry with this particular project so that I could actually get it done in time for Christmas.  So in my hurry I decided I could just kind of figure things out as I went.  Big mistake.  I ended up having to completely start over.  Which of course took way longer.


Tip #2: Always plan out the whole project before you begin.  Especially before you begin cutting things out.


If I had done that, I definitely would not have cut out the arms/legs and hands/feet separately.  I would have done arm-hand pieces, and leg-foot pieces.  But one reason I cut them out separately goes with my next tip -

Tip #3: Make sure you have extra fabric just in case.

I actually bought this fabric to make dinosaur slippers (post on that coming soon, if I ever finish them), but decided to use what was left for this project.  And I would have probably had plenty if I hadn't had to start over... but then I was just trying to use any little usable bit of fabric that was left, and had to cut out the little hands and feet separately.  
Which led to difficulties later, such as how exactly do I stuff the hands and feet prior to attaching them to the arms and legs?  And have everything be right side out without all sorts of weird ugly seams?  

The answer - I kind of didn't.  I managed to kind of tuck under the edges and cram the hands and feet down in there and then stitch over it.  It's a little ugly, but hey, my 18-month-old doesn't seem to notice or care.
So make sure you've actually planned everything out, and you have enough fabric to cut out the pieces you need.  It's probably common sense, but when I get an idea for a project, I tend to just dive in without thinking everything through first.  And often half way through I have to go to the store to get something I realize I need and should have had in the first place.  Maybe some day I'll be more organized.

Tip #4:  If you are in a hurry and doing something you've never done before, use a pattern.  Don't try to make your own pattern.  Especially if you don't like doing math.


These are the pieces I cut out from the pattern I found on The Purl Bee.  They turned out much better than my first attempt, which was more of a weird lumpy polygon than a sphere... Like I said, I don't like math. And I was trying to hurry. 

Lest this post leaves you thinking I'm completely incompetent, not just mostly, I'll show you the finished product (because I think that actually turned out pretty well, in spite of everything.)
   
See?  Looks mostly like the original.  :)


Saturday, December 31, 2011

some Christmas presents and a New Year's Resolution

Sorry I've been mia the last little while... I've been pretty sick the lat few weeks, and I was busy finishing last minute Christmas orders, plus all the Christmas festivities!  But I wanted to share a little of our Christmas and get ready for the new year.

So here are a few of the Christmas presents I actually managed to get finished in time:

Meet Mike Wazowski!  My little boy is in love with most Pixar movies, but especially Monsters Inc.  (I think he thinks Sully is a big dog.  And he loves dogs.)  So I made him this little guy for Christmas!  He's given him hugs many times now, and tried to pull his mouth off a few times.  I think it's a success.  

I'm really proud of how the eye turned out - I drew it on by hand with fabric markers.  It may not seem that impressive to most of you, but I'm terrible at drawing, so any time I "draw" something that looks good, I feel a little better about myself.  :) 

And this pillow was for my sister.  She's in love with The Princess and the Frog.  Don't worry - she's in college.  She's cool like that.  ;)


Some day I'll finish the five or six others that being sick - and being me - prevented me from finishing.
Like these dinosaur slippers that I got all cut out but never sewn... Or the pirate quiet book I started in October that is going to be super awesome!  Soon.  Hopefully.


Now for some good news and a New Year's resolution!  The blog passed 1,000 views right about Christmas!  Even in spite of my not posting much recently! 

So here's my resolution:  to post more regularly.  

My original goal was to post a tutorial every Monday, and 1-2 other posts the rest of the week. I'd really like to do that, but I'm not sure if it will happen.  But I will resolve to post at least once a week from here on out to keep building up my viewership and (I hope!) providing you readers with some fun and useful posts.

Happy New Year everyone!


Monday, December 12, 2011

flannel hand warmers

So I had this great idea where I was going to do a 12 days of Christmas thing, and call it the "12 Crafts of Christmas," with tutorials and ideas for fun Christmas crafts that went with the number for each day.  You know, 3 wise men for day 3, something with a 5 pointed star for day 5, etc.  Great idea, right?!  But life has a way of catching up to you, and, well, that idea is going to have to wait until at least next Christmas.

Instead, I decided I'd just blog about some of the Christmas presents I'm making for my family members.

So today's is a present I made for my younger sister who is currently serving a mission for our church in St Paul, Minnesota.  And since it's freezing there, I decided to make her a little something to help her stay warm while walking around the city.

(Please ignore how wrinkly my hand looks in these pictures... it was the way I was holding the hand warmers.  Or at least that's what I'm telling myself.)


Not only are these little hand warmers super cute, and very useful, but they were also really easy to make!
But if you don't feel like making them yourself, check out my shop where I've got them for sale.


Here's what you'll need:

Flannel in any color/pattern (you only need about a 6" square for a pair of hand warmers)
Coordinating thread
Pencil or fabric marker
Rice (about 2-3 Tbsp per hand warmer)
Pinking shears
Sewing machine
Needle


1. Find or draw a heart shape approximately 3" x 3" (I just drew/cut mine on a piece of paper.  But a cookie cutter or stencil would work well too.

2. Trace 4 hearts onto the fabric.

3. Cut out with pinking shears.  (Regular scissors are fine, but the pinking shears help keep the edges from fraying.  So if you use regular scissors, you might want to use fray check or something on the edges.  Or if you're awesome and have a serger, just use that.)

4. With wrong sides together, stitch around the edge of the heart, leaving at least 1" open to fill with rice.

5. Fill with 2-3 Tbsp. of rice

6. Hand stitch the heart closed the rest of the way.

7. Warm it up in the microwave for about 30 seconds, and keep your hands warm for about 30 minutes!


You can use other fabrics besides flannel, but I like to use flannel because it's soft, fairly durable, and holds the warmth pretty well.  

Another bonus about these hand warmers?  They would make great stocking stuffers!  They're the perfect size to stick in a stocking.  And if the heart's a little too girly, any shape will work.