Thursday, September 18, 2014

construction site birthday party

Apparently I took the summer off from blogging. Not necessarily intentionally, just other things taking up my time! So I'll try to get caught up a bit - starting off today with some fun birthday party ideas, then I'll try to catch up on all my preschool posts!

My little man turned four this summer, and for many months leading up to his birthday he kept telling me all about the construction party he wanted to have. I of course turned to Pinterest for some ideas, but so many of them were so over-the-top (who has the time/money for this? He's turning four! Ok, I'll save that rant for another day...) that I ignored most of them, borrowed from a few, and came up with some of my own. So here's my take on a budget-friendly, relatively low-key, lots of fun construction party.


Let's start off with the invitations:


I just printed them from our computer, and glued them onto yellow paper which I'd colored black stripes on. Jack helped me put construction stickers on each invitation. (Note: we didn't invite a ton of people, so doing the stripes by hand wasn't a big deal. You could also do them on the computer and just print it that way. Or just do plain yellow or black paper)

Decorations were pretty simple: some black tablecloths from the dollar store, a couple of construction truck paper stand-up cutouts, some yellow crepe paper, orange construction cones (which my husband already had for work) and construction signs (free printable here).

Since we had the party in our backyard, we put a "detour" sign by the front door, and this construction cone and sign in the driveway by the gate to our yard.

For activities for the kids, we got plastic hard hats (super cheap on amazon!) and put each kids'  name on a hat, and let them decorate them with construction stickers.
The birthday boy (who wore his hard hat for the entire day of course) waiting for his friends to come!

We set up a "construction zone" in some dirt in our yard and in our sandbox.


We also set up a little obstacle course game with construction cones, wheelbarrows, trucks, etc. But of course I forgot to get any pictures of that. But the kids loved just running back and forth and around all the different things. (I just set them up and let the kids run however they wanted. They were happy!)

And my (and the kids!) favorite activity was the wrecking ball. I made a "building" out of cardboard boxes, and they got to wreck it with a balloon tied to a rope hanging from a tree. 

I cannot tell you how many times those boxes got stacked up and knocked down again! (Note: I filled the balloon partially with water to give it a little more weight. Yes, we went through a few because they eventually popped. But the kids didn't mind getting wet. You could use something else to weight it of course, but that was easy and worked for us!)

And last but not least: the cake! This is what Jack kept telling me he wanted for his birthday for months prior, so I knew I had to figure out a way to make it. And it really wasn't that hard!


There's a dump truck dumping whopper "rocks", and oreo crumb and toffee bit "dirt", with an excavator digging out the side of the cake, and a bulldozer driving up a ramp on the side.

(If you're thinking this one looks lighter, you're right. I made this cake twice since we had a family party and friend party, one with milk chocolate and one with dark chocolate frosting. But it really was pretty simple so I didn't mind!)


I used 12" and an 8" spring-form pans for the two layers. Since cakes always come out a little rounded on top, I cut part of the bottom one so the top layer would sit flat, and used what I cut off to make a ramp from the lower layer to the top layer. That's where the bulldozer was. Then I just used a fork to dig out part of the side of the cake where the excavator would go. You can use this as "dirt" later if you want. Another tip: if you're using canned frosting, warm it up a little before you frost the cake. It spreads so much easier!!

One of the nice things about this cake, is that it's ok if parts of it get a little crumbly - it's just more dirt! Since I was using Oreo crumbs for dirt, I scraped out the filling and used that as "glue" to help the trucks stick to the cake, and to stick the "rocks" into the dump truck. Between that and the frosting, they were actually stuck on pretty well!

Ta-da! Awesome construction site cake :)

So there's my take on a low-budget, low-fuss construction party. We did the whole thing for probably $30 (including food), and the kids had lots of fun mostly just running around the yard and playing in the dirt. A few tips: use things you already have, shop at the dollar store (especially for paper goods!), and keep it simple and let the kids play!

Monday, May 5, 2014

A Letter a Day preschool unit - F through J

Here's the next set of letters for my "a letter a day" preschool unit! You can see the first ones here.
And remember before reading the story, introduce the letter and theme for the day.
For example, on the day you teach the letter F, hold up the book and ask the kids what they see on the cover ("a fish!"), then say something like, "Today we'll be learning about the letter F, and fish starts with the letter F." Point to the letter F in the word fish so they can see what it looks like. Make the F sound and have the kids make it too.


F - Fish

Books: Rainbow Fish by Marcus Pfister, Fidgety Fish and Friends by Ruth Galloway

Activities:
Go Fish - cut out paper fish of different colors/sizes and put a paper clip on each one. Put a magnet on the end of a string and attach the string to a stick to make a fishing pole. Have the kids go fishing. You can have them sort the fish by color or size, or have them try to "catch" specific colors/sizes.

Make construction paper fish - cut out the scales ahead of time (we used cut up bits of curly ribbon), and cut out or draw a fish shape,  and have the kids glue the scales on the fish, then draw/paint water, bubbles, etc.
He used little bits of curly ribbon as fish food! We also help them write or stamp the letter on each page to help with letter recognition.

Snacks: goldfish crackers


G - Grandparents

Books: Grandma, Grandpa, and Me by Mercer Mayer

Activities:
Family picture puzzles - get a picture of each child's grandparents ahead of time and cut them into simple puzzles for the kids to put back together (best if they glue them onto a paper)

Write letters or draw pictures to send to grandparents.

Snacks: "gram" crackers


H - Hats

Books: The 500 Hats of Bartholomew Cubbins by Dr Seuss, The Cat in the Hat by Dr Seuss, Old Hat, New Hat by Stan and Jan Berenstein

Activities:
Make newspaper hats. (Here are simple instructions.)

Try on different types of hats and discuss what each is for, or have each child put on a different hat and act like the person who would wear it (cowboy, bike rider, baseball player, etc)
We had a baseball hat, helmet, snow hat, straw hat, etc. And there's the paper hat we made on the bottom right.

Hat matching - print out pictures of hats and the person they belong to and have the kids match them (e.g. cowboy hat and cowboy, sun hat and a kid at the beach, chef hat and chef).


I - Insects

Books: The Very Hungry Caterpillar by Eric Carle, Diary of a Worm by Doreen Cronin, Diary of a Spider by Doreen Cronin, Big Bugs Small Bugs by Alex Lluch

Activities: Thumbprint/fingerprint bugs - make a row of fingerprints to make a caterpillar, do individual ones and draw on wings or legs for bees, butterflies, ants, beetles, etc

Egg carton caterpillars - cut the top off an egg carton, then cut it in half lengthwise. Have the kids add pipe cleaner antennas, googley eyes, and paint/color them.
This caterpillar had googley eyes, until my son pulled them off...

2teachingmommies.com ant, bee, and/or butterfly units also have lots of fun activities

Snacks: "ants on a log" (celery with peanut butter or cream cheese and raisins), gummy worms in chocolate pudding


J - Jungle

Books: Jungle Animals by Angela Royston, Rumble in the Jungle by Giles Andreae, Walking Through the Jungle by Julie Lacome

Activities:
Make paper plate animal masks

This is from Artsy Momma, but there are lots of different ways you can do jungle animals on paper plates

Animal print match up game from the preschoolexpress.com jungle theme

Play Simon Says and have the kids act like/sound like different jungle animals. (e.g. Simon says roar like a lion. Simon says stomp like an elephant.)

Snacks: animal crackers


Now that our "school year" for our preschool group is nearing it's end, hopefully I'll have more time to get all of the rest of these posted! The kids have had a lot of fun with our little preschool group!


Friday, April 18, 2014

a more meaningful Easter egg hunt

I got to host our Easter day for our preschool group, and I wanted to do something a little more focused on Christ for our Easter activities, to teach them the actual story of Easter. I came across this fabulous idea to put items and scriptures inside plastic eggs that tell the story of Christ's crucifixion and resurrection.


I've seen this idea on Pinterest and many other blogs, so I most definitely can't take credit for it. But I adapted it a little bit (there are quite a few different versions) - either for objects that I had available, or ones that I liked better than the ones suggested. I also discovered that some of the scriptures listed didn't really match up with the objects. So I found scriptures that I thought matched better, and made a nice little printable to share!

You'll need 12 plastic eggs, an empty egg carton (optional, but it helps keep the eggs, and the kids, organized), and sharpie to get started. Just number the eggs 1-12, and then number the slots in the carton as well.


Here are the 12 items I used for my eggs:

1. cracker
2. 3 dimes
3. rope/twine
4. red cloth (I used a piece of ribbon)
5. cross (I made mine with two little sticks and some glue)
6. nail
7. dice
8. black paper/cloth
9. strips of white cloth (I used gauze bandage)
10. spices
11. stone
12. empty


For the scriptures that go with each item, click the image below for the printable. I just cut them apart, and folded them up to fit in the eggs with the objects. 


We didn't read the scriptures for our preschool group (I thought that might be a little too long for a group of 3-4 year olds) but I hid the eggs around the house, and had them find them, and when they found one they had to go match it to the right number in the egg carton before they could go find any more. This kept them from wanting to open them all up right away. Then we opened them in order, and I just summarized what each one was for.

I really enjoyed doing this activity. It's a more interactive way to tell the Easter story, gets the kids a bit more involved, but still keeps the focus on Jesus. I definitely think we'll do it again next year!

Wednesday, April 16, 2014

A Letter a Day Preschool Unit - A through E

I've written before about our little preschool group, and wanted to share some of the curriculum with you!

One thing I like about our curriculum is that it's fairly simple - for most days you can just use paper, crayons, glue, or other things around the house to do all of the activities. It's hands-on and fun, and doesn't require a whole lot of prep time for the moms! But the kids are still learning and having fun, which is the goal.

We decided to start with working on the alphabet, doing an alphabet intro and then a letter a day - which worked out perfectly for our entire fall "semester!" We started in September, and finished a few weeks before Christmas, with the letter P even landing on the week of Halloween for "pumpkin!" (We meet twice a week, and the schedule worked out perfectly)


Before reading the story each day, we introduced the letter and theme to the kids. For example, for the letter A you might hold up the book, and point to an apple on the cover, and ask the kids what they see ("an apple!") "Today we are learning the letter A, and apple starts with A." Point to the A in the word apple so they can see what it looks like. Have them make the A sound with you. Doing this helps reinforce learning the letter, not just learning about apples or whatever that day's theme is.

We also stamped, wrote, traced, or put a letter sticker in their notebooks where they do their art/craft activities for each day to help them learn what each letter looks like. (The notebooks are just drawing pads I got from the dollar store.)

The books I have listed for each theme are based mainly on what books we had available either from my own shelves our from our local library. There are lots more for each topic if you can't get these ones! But I like to list a few for each day so whoever's teaching that day has some to choose from, depending on what they (or the library) have, or what books they like better.

I think the whole alphabet in one post would be a bit… overwhelming. So I'll just do the first few today, starting with our alphabet intro day.


Alphabet Intro

Books: Dr. Seuss's ABC's by Dr Seuss, Chicka Chicka Boom Boom by Bill Martin Jr, or any other alphabet book

Activities:
Sing/teach the alphabet song
Alphabet matching game - print out two copies for each child and cut one up to have them find the match; or print one copy for each child and use alphabet magnets/stickers/cookie cutters to match. Alternate versions - for kids who already know their letters, have them match capital and lowercase. For kids who don't know their letters at all, give them only one page, or a half page, to match.

click the image for the full downloadable set of capital and lower case alphabet squares
Use construction paper and letter stickers to decorate the cover of their notebooks. Help the kids find the letters to spell their names so they'll know which book is theirs.

Jack's "a letter a day" preschool notebook, with his name, and a train sticker of course!
Snacks: alphabet cookies (they sell them at Trader Joes, but you could probably find them other places too)


A - Apple

Books: Ten Apples Up On Top by Theo Lesieg, How Do Apples Grow by Betsy Maestro

Activities:
Apple stamps - cut apples in half horizontally (so you can see the "stars" in the middle) and use them as stamps with paint

We used "apple stamps" to stamp inside the letter A, and counted and glued apple seeds onto the A

Here we used "apple stamps" and a letter A cookie cutter as a stamp
Count apple seeds to practice counting
Size sequencing (e.g. smallest to biggest) or color sorting with apples or pictures of apples
Check out the 2teachingmommies.com apple unit for other ideas and printables

Snacks: apple slices


B - Balloon

Books: Where Do Balloons Go? by Jamie Lee Curtis, A Ballon For Isabel by Deborah Underwood

Activities:
Sort balloons by color/size/shape
Play balloon games - passing to different people (e.g. pass to someone wearing blue), counting how many times they can bounce it without it dropping, etc
Sensory balloons - fill balloons with things likes flour, rice, beans, etc. and have the kids feel and talk about the texture and guess what's inside
Cut out different shapes (e.g. circles, ovals, hearts) from construction paper, and have the kids glue them in their books and draw balloon strings. You can use this to practice/learn shapes


Balloon experiment - fill an empty water bottle about 1/3 full with vinegar, add a few tablespoons of baking soda, and put the balloon over the mouth of the bottle to watch it fill up


The balloon experiment is lots of fun! A few tips: use a funnel or a rolled piece of paper to get the baking soda into the bottle. And get the balloon on as fast as you can so the gas from the baking soda and vinegar actually fills the balloon!


C - Cloud

Books: Little Cloud by Eric Carle

Activities:
Cloud watching
Make cotton ball clouds - glue cotton balls onto blue paper


Rainstorm in a cup - fill a clear cup about ⅔ with water, then top it with shaving cream, and drip about 5 drops (approximately) of blue food coloring onto the shaving cream to drip through like rain (it takes a few seconds, so be patient before adding more food coloring)

The kids loved making clouds and rain! They got so excited when the first "raindrops" came through the clouds.  (I forgot to get a picture when we did the cloud experiment, so this picture is from ehow.)

Make and play with cloud dough (4 cups flour, ½ cup baby oil) (it's like play dough, but a really cool texture)

Snacks: marshmallow "clouds," cottage cheese, drop biscuits


D - Dinosaur

Books: Dinosaur Roar by Paul and Henrietta Stickland, Danny and the Dinosaur by Sid Hoff, Three Little Dinosaurs by Charles Fudge, I Am a Tyrannosaurus by Anna Grossnickle Hines (and tons more!)

Activities:
Dinosaur sorting with toy dinosaur figures or pictures (sort by size, color, herbivore/carnivore, walk on two or four legs, etc depending on what your kids are able to do)
Fossil dig - hardened salt dough with toy dinosaurs inside (make salt dough a day or two ahead of time and put the toys inside. Let them harden, and have the kids use forks or something similar to "dig" the dinosaurs out of the "rocks." For a "salt dough" recipe that works well for fossils, check out the dinosaur egg idea over at Projects for Preschoolers)
Make fossils - Make salt dough and use toy dinosaurs to make dinosaur footprints in the dough and let it harden into fossils
Letter D dinosaur - turn a capital D on its side and give it spikes, legs, tail, etc
Check out the 2teachingmommies.com dinosaur unit for more activities and printables


E - Elephant

Books: What Elephant by Genevive Cote, Elephant Families by Arthur Dorros

Activities:
Make handprint elephants - thumb is trunk, fingers are legs, then draw on ears, eyes, tail

You can trace their hands or use paint to make handprints. It mostly worked… but then he wanted to practice writing E's all over his elephant!
Elephant train - have kids make "trunks" with their arms and form an elephant train, stomping and trumpeting around like elephants

Snacks: peanuts, animal crackers


I'll post the next few letters soon! You can keep things really simple, even just having the kids color or draw pictures that go with your letter and theme. Or you can do some of the more elaborate activities too.  One of the things I try to keep in mind when planning activities for each day is to have a few different types - something "crafty," and something more physical or sensory. But the kids are learning and having fun, so mission accomplished!

Wednesday, March 26, 2014

Preschool - getting started

Last fall I started a little preschool group with some of the moms and kids in our neighborhood. We meet twice a week for about an hour (often longer so the kids can play and we can visit). We spent the fall learning the alphabet - more on that coming soon! - and since then we've done shapes, our bodies, seasons, and more. It's a lot of fun, and we keep it pretty low key. The idea is to help the kids learn routines, structure, and social skills, and to learn through play. We do lots of hands-on activities and games, and just like to have fun.

Here is the basic schedule we follow every day:

Welcome Song
Calendar
Weather
Story Time
Activity
Play Time
Clean Up
Snack


I bought one of those hanging pocket things at the Dollar Spot at Target (love that place! that's where I got a lot of our preschool stuff) and it fits perfectly - just the right size and right number of pockets! We just have a little star that we move down the chart as we get to each activity.


Here's a link to print your own!

Let me outline what a typical preschool day looks like, to show you how simple it is!

We have the kids each sit on a carpet square (you can get them for like $1 at a carpet store), then start with a welcome song to (hopefully) get the kids' attention and signal that we're ready to start.

For calendar, we have the kids repeat the day/date with us, and put stickers on the calendar for that day.

We have a little weather chart, and have the kids point to what the weather's like and talk about it. (We just printed and laminated the one I linked to, but there are tons of cute ideas for making your own if you're feeling more crafty/ambitious!)

Story time is reading a book that introduces and teaches or goes with the topic we're learning about that day. We will usually tell them a little about our topic before reading. (e.g. Today we're learning about the letter A. Apple starts with A [point to the A], and this book is all about apples!)

Activity should really be labeled "Activities" because we often have more than one. We almost always do some sort of art/craft activity - coloring, gluing, tracing, etc. something that teaches more about the topic we're learning. And we also often do some type of more interactive activity or game - a matching game, Simon Says, a science experiment, sorting things, sensory activities, etc.


(Just a few of the arts/crafts activities we've done)

Play time is just that! By the time we finish our activities, most of them are a little restless to just do their own thing (even when the activities are more active) so we let them just get out the toys and play for a bit, or go outside if the weather's nice.

Sometimes for snacks we do something that goes with the theme or topic of the day (when we're feeling ambitious or it lends itself more easily to that, like apple slices for the letter A), but often we don't. The kids don't really seem to care either way!

One of my more "ambitious" snacks - we had learned about healthy bodies that day, so I made a face out of healthy snacks 


It really can be so simple! The kids enjoy it, and are learning from it, and we don't have too much stress in planning and executing the lessons. I've outlined all our units so far, and will be posting those soon!

So if you're thinking of doing preschool at home with your little one, my suggestion is to keep it simple and keep it fun. Don't stress too much about having a perfect "pinterest worthy" lesson every day. The kids enjoy it even if their art projects don't turn out as perfectly as you'd hoped or the game you planned devolves into chaos (or the cute picture you tried to take turned out blurry cuz your kid won't hold still - see below!) The most important thing is that you're engaged and investing in their learning process, and showing them that learning is important and fun!


Wednesday, March 12, 2014

How to be a good mom

The internet is flooded with blog posts, parenting articles, pictures, lists, etc on what it means to be a good mom and how to be a good mom. Now, if you're anything like me (and most moms I know) you'll have many moments, or days, or months, where you don't really feel like a good mom. And reading these things leads to simultaneously feeling encouraged and discouraged. (I know, women are weird, right?) I'm waffling between thinking, "yeah, I can do this mom thing!" and criticizing myself for not already doing all those things.

Lately I've been much more on the feeling-like-a-failure side of this fence. My quite energetic, tantrum-prone, strong-willed child was going through a difficult phase, and I was having a rather hard time dealing with it. After lots of introspection, prayer, reading parenting books/articles, talking to my husband and my mom, I'm feeling a bit better. Why? Because after all of this I've come up with a fabulous list for you that is a "sure-fire guaranteed way to be a good mom."

Ready for it? Here's my list:

1. Love your kids and let them know you love them.


Seriously, that's what it all boils down to. Sure, there are tons of different ways to do this. And I certainly haven't perfected it yet. But at the end of the day (or at the end of many years when your child is all grown up) what they're going to remember is that you loved them.

Here is my mom with her kids, all grown up. We love each other :) And can be a bit ridiculous at times, like ambushing her when we're supposed to be taking family photos. My mom will be the first to tell you that she wasn't a "perfect" mom. But I never doubted that she loved me. And we all turned out ok. I think. :)


I remember so vividly when my babies were born, and holding them for the first time, and being filled with more love than I ever imagined. And it's that powerful, eternal love that I try to hold onto, to bring back to the surface, in the moments that are a bit more challenging.


Somehow in the chaotic monotony of everyday life, we still know that we love our children - that never changes - but sometimes it takes a backseat to dealing with life. Yet I've discovered that if I actually let that love take the steering wheel, the road gets so much smoother.

I usually don't get particularly religious on this blog, but I don't feel I can talk about this subject any other way. But I think the ideas and principles can apply to everyone.
I was reading in Corinthians recently, the chapter on charity, and some things struck me a bit differently than usual.  The beginning of the chapter lists all sorts of wonderful attributes and acts, but then says if you have all these attributes, do all these wonderful things, but don't have charity, it's worth nothing.
So we can be the best mom in the world based on how clean our house is, how smart our kids are, how picture-perfect everything is, but if we don't love our kids, and show them that love, none of it matters.

Lest anyone thinks I'm claiming to have all this parenting stuff perfected, here's a classic example of how not "picture perfect" my life is… :) Most of our pictures are blurry because the kids won't hold still, they aren't looking, or are crying, or are being crazy. Pretty sure I'm not wearing any makeup. And yes, I think my baby is trying to eat his brother. You know how it is.


The next thing that struck me from this chapter was the oft-quoted line: "Charity never faileth." Now I know it means here that charity is dependable, can be counted on to not vanish, cease, etc. as the verse goes on to say. But it struck me that it can be applied here in another way:

If we have charity, we cannot fail. If we show love toward our children, we cannot fail.


Will this automatically make everything in life perfect? No, of course not. There are still the daily challenges of life, the frustrations, the sleeplessness, the piles of laundry and dishes, the tantrums (from you or your kids - I won't judge), and all that comes with just being human. But if we're trying to act from a place of love and charity, it gets a lot easier. When I find myself acting out of frustration, anger, fear, or any of the other negative emotions that take hold, I try to take a step back, take a deep breath (or 20), and come back to the situation from a place of love.

I recently read a parenting book that I actually recommend: Easy to Love, Difficult to Discipline by Becky Bailey. She breaks parenting down into "The 7 Powers of Self-Control" which coincide with "7 Discipline Skills", which lead to "7 Values for Living."


As I was reading, especially the 7 Values for Living, I couldn't help but think that these were basically characteristics of Christ. She doesn't connect it to religion or religious beliefs in her book, but how could I not see the attributes of Christ in such ideas as compassion, integrity, empathy, and allowing our children to exercise free will, but teaching them to act responsibly?

So this brings me back to 1 Corinthians 13, and how the attributes of charity are the attributes of Christ, and therefore  the attributes of a good parent.

Charity suffereth long - be patient with yourself, and with your children, and with the never-ending cleaning, diaper changing, midnight-feedings, laundry, "why mom?"s, homework help, and everything else that comes with being a mom.

and is kind -  show them love and kindness in your words and actions

charity envieth not -  this one's a bit different in a parenting approach. To me, it means to not compare to those other moms out there who seem to have it all together. We all have good times and bad times, and not everyone sees the bad times. Just keep keep having charity!

charity vaunteth not itself, is not puffed up - be humble, willing to learn from your mistakes, and apologize. Sometimes it's hard for me to apologize to my kids; I somehow got it in my head that they should think I'm perfect and know everything. But I'm not, and I don't, and I need to set that example for them of humility and teachability.

Doth not behave itself unseemly - apply this one how you will. Maybe try to keep your tantrums to screaming in your pillow in private :)

seeketh not her own - put the needs of your family and children first. Yes, there are times where you absolutely need to take care of yourself to be capable of taking care of your family. But (at least for me) there are other times where I'm just being lazy/selfish and would rather do what I want than what my children need. 

is not easily provoked - hmm, that temper of my son's? He gets it from me. This is where the taking a calm breath(s) comes in, or sometimes a time out for both of us! That way, when I/we have regained composure, we can better deal with the problem in love not anger.

thinketh no evil - I'm gonna take a little liberty on this one from what perhaps the actual Biblical meaning is, and apply one of the ideas from the book mentioned above. We need to assume positive intent in our children's behavior, rather than "thinking evil" of them or their behavior. If we assume negative motives when they misbehave, it leads to more conflict. But if we ask their intent, or assume positive intent (e.g. "you hit your brother because he took your toy and that upset you" rather than "you hit your brother because you're mean and horrible") then we can work together to solve problems instead of working against each other.

rejoiceth not in iniquity, but rejoiceth in truth - find joy in the beauty of parenting, the little moments of sweet, pure love; another scripture says "truth is knowledge of things as they are" - find joy in the now. Find something every day to rejoice in. Even if it's just one thing. Even if it's just that you made it through another day!

beareth all things - this one goes nicely with "suffereth long" for me. There will be tough days. But keep charity in your heart, and it becomes so much easier to bear!

believeth all things, hopeth all things - Have faith! In yourself, and in Christ. Over these past few months, I've come to know that I can't handle being a mom on my own strengths, knowledge, or abilities. But I don't have to. I already have the perfect example, and I just need to have the faith to follow Him.
  
endureth all things - I don't think I need to say much more on this one, other than you can do it! Refer back to "suffereth long" and "beareth all things."

Charity never faileth - Like I said before, if we have love, we cannot fail.


Being a good mom (or dad, or person) is less about the things you do, and more about the person you're trying to be. 

Monday, February 3, 2014

birthday train cake

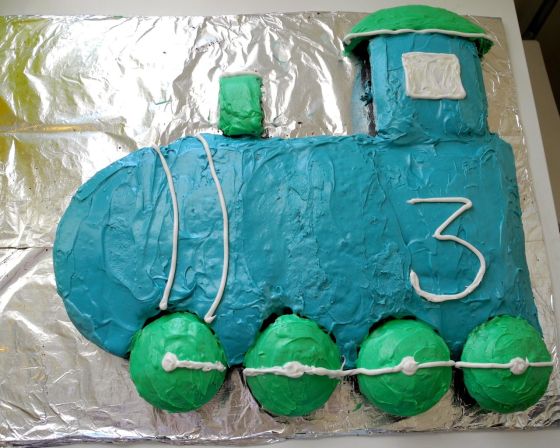
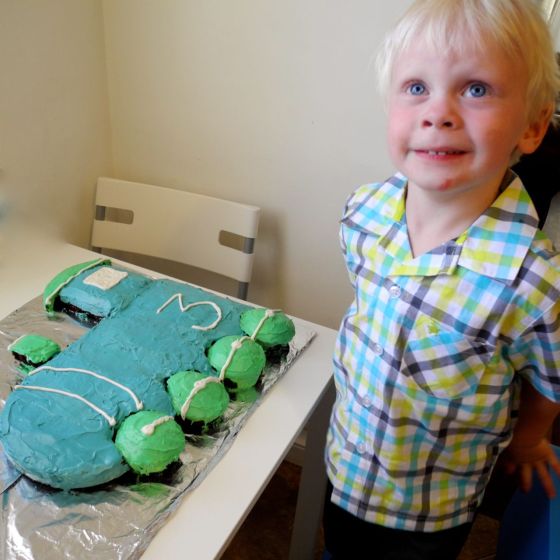
This is the cake I made for my son's birthday a while ago*. He's completely obsessed with trains, so I decided to make him a train cake. For his second birthday, I made him a car cake, but this year's definitely had to be a train.                                                                                                                                     (*I posted this on my other blog last summer, but for some reason never posted it here.)
train locomotive birthday cake
He even picked out what colors he wanted. (Ok, so he actually wanted some yellow too, but I didn't feel like making three different colors... I'm sure it would have been cute though!)
So, this cake turned out kind of big... I had to cut out a piece of cardboard from a box and cover it with foil because I don't have any plates big enough to hold this cake. I used two cake mixes to make it, and two cans of frosting. If you're making the cake/frosting from scratch, you'll want to double the recipes.
Here's what you'll need to make a train cake:
2 boxed cake mixes (and everything needed on package to make) or double batch of your favorite cake recipe
2 cans of frosting or double batch of favorite frosting recipe
Food coloring
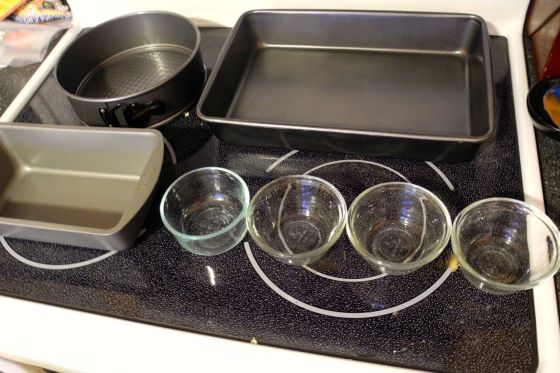
1 9x13 sheet cake pan
1 9" round cake pan
1 loaf pan
4 glass ramekins  (6 or 8 oz)
Large platter or cardboard covered with foil

train birthday cake how to
Here's all the different pans I used to make the train cake. I know, I'm a little crazy. But it actually wasn't that difficult, just a little time-consuming. And I'm sure you can tell I'm no pro at cake making/decorating, so really it's not that hard.
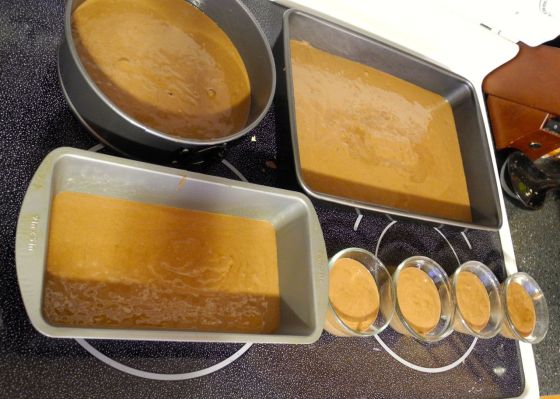
So once you've got your cake batter ready and oven preheated, evenly distribute the batter between all the pans. You'll want them to all be about the same height (the wheels can be a little higher) so that when you put all the pieces together they're pretty even.
train cake how to
Each pan was probably only about 1/2 full, and the ramekins were about 3/4 full. Since I had so many different sizes, and they weren't quite as full as normal, I checked them fairly often for doneness. The little ones were done in about 15 minutes, everything else in about 30 I think. Let them cool a bit, then turn out onto cooling racks to finish cooling.
Be especially careful with the sheet cake when removing it from the pan - mine cracked! It turned out ok once I frosted it, especially since I had to smooth the edges between the different pieces anyway.
train locomotive cake how to
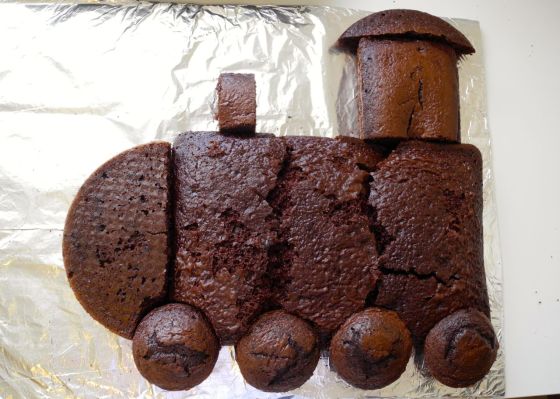
The 9x13 sheet cake makes up the main body of the locomotive. Cut the 9" round in half, and put one half on the end of sheet cake to make the front of the locomotive. Cut about 1/3 of the cake from the loaf pan off, and use the remaining 2/3 to make the cab. Cut a small piece from what's left to make the funnel. Cut a small piece from the round edge of the remaining round cake for the roof of the cab.
Set each of the wheels over the cake where you want them, and cut around them to make a slot to insert the wheels.
Now mix up the colors you want for the frosting. I used one whole can of frosting to frost the main portion of the cake (the blue). Then I mixed about half of the other can in green for the wheels and other accents. I left the rest white for trim, etc.
My trick for frosting this cake without it crumbling to bits? I melted the frosting. I stuck it in the microwave for about 30 seconds until it was nice and runny. Then I let it cool for a few minutes, and then basically just poured it on the cake, and used a knife to smooth it out. I took the green pieces off first so the blue wouldn't run onto them, and frosted those on a separate plate. Then I put everything back to together, added the white trim (you can just use a plastic bag and cut the corner, or use actual frosting tips), and ta-da! We had a locomotive cake!!
train birthday cake
Love this bright, energetic, crazy, fun little birthday boy! And he loved his train cake!!