Thursday, February 21, 2013

preschool activities - learning letters

I've been seriously slacking in the creating department lately... I haven't made or listed anything new in my etsy shop since Christmas! Part of that was moving (my sewing machine's been in the garage since we moved...), part of it was being burnt out from Christmas orders, but I think the biggest part is that my creative energy has mostly turned elsewhere - to preschool! I've been having lots of fun planning activities, themes, games, crafts, etc. I think it's the teacher in me resurfacing. Maybe it makes me a huge nerd, but I love designing curriculum!

Some day I'll get organized and actually post more details on all of our activities, but for now how's a little sampling of some of the fun we've been having.

We're learning a letter a day! So I've been coming up with a theme based on each letter, and we read stories that go with that theme, and then do some type of craft or activity to go along with it. My goal with this is primarily letter recognition - we're still a ways away from reading I think. But it seems to really be helping with knowing what each letter looks like.

We try to do projects/crafts with things we already have around the house - so we did apple stamping for the letter A (which didn't turn out very well... but you just cut the apple in half horizontally so you can see the star in the middle, then use it as a stamp); cotton ball clouds for the letter C; a paper hat for the letter H; an egg carton caterpillar for the letter I, for insects; pipe cleaner, googley eye, and pom-pom monsters for the letter M; and a toilet paper roll owl for the letter O.


Holding his egg carton caterpillar - so easy to make! Just cut an egg carton in half, poke a pipe cleaner through for antennae, and let them color it with markers. We also glued on googley eyes, but he has since pulled them off of course. He also named his caterpillar Plau. No idea where he came up with that one. (The owl's name is Bert. They're friends now.)
  
We did hat sorting and counting for the letter H. I got out about 10 hats belonging to different family members, and we sorted them by size - smallest to biggest. He's wearing baby brother's hat in this picture. It's his favorite because it has a dinosaur.


Now lest you think I live in some perfect world where my two-year-old magically goes along with all of the preschool activities, I had to bribe him to take the hat picture. He threw a huge tantrum when I tried to put the paper hat on his head. The playdoh was 1) supposed to be 4 distinct colors and 2) not be in his train car (which he now calls his playdoh car). And there are many days where he informs me he doesn't want to do preschool (once we get started he's usually happier about it). But one day we were running a bit later than usual, and it was past the time we normally start, and he looks up at me and says, "Mommy, I want to do preschool!" Makes it all worth it. Plus, he actually knows most of the alphabet now!

A few other ideas for learning letters - check out the website starfall.com. It's got lots of great games and activities! We've been doing the ABC activities each day for the letter we worked on that day. 

We also found this iphone app called Endless Alphabet, and it's great! (and free!) Jack calls it monster letters because they have these cute monster animations, and when you touch the letters they get little monster faces and make the sound of their letter. So it teaches what the letters look like and sound like, and new words and how to spell them.

Well, if I ever get organized enough I'll do a series of posts with some of the ideas/activities for each letter. In the meantime, I'd love to hear any great ideas or activities you've come up with!

Friday, February 15, 2013

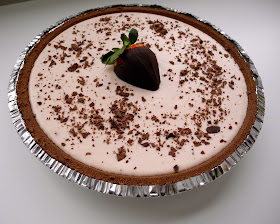
chocolate covered strawberry cream pie

Happy Valentine's Day! I hope it was filled with lots of love (and chocolate!)

Here's what I made for our Valentine's treat:


Chocolate Covered Strawberry Cream Pie

I love making pies. I make lots of pies for Thanksgiving (have since I was in junior high) and I have a little dream to one day open up a little pie shop. So I often invent pie recipes in my head. I rarely actually make them... but I'm working on ways to make that happen more often (without consuming mass quantities of pie.)

Therefore I give you: Valentine's Pie!

For this pie I actually broke one of my cardinal rules of pie making - I used a store-bought crust! But I knew I didn't have time to experiment with making my own chocolate crust, and I needed a disposable pie tin (I took one of the pies to a neighbor) so I caved. It wasn't terrible... but I definitely want to come up with my own crust for this pie next time.

This recipe makes two pies - perfect for sharing the love!

Chocolate Covered Strawberry Cream Pie Recipe

2 chocolate cookie pie crusts (like Oreo or Keebler)

Chocolate custard:
5 Tbsp cornstarch
1 cup sugar
pinch of salt
2 1/2 cups milk (I used 2%)
3/4 cup half-and-half
3 egg yolks
2 Tbsp butter
1 tsp vanilla
1/2 cup dark chocolate chips (milk or semi-sweet would work too)

Strawberry cream:
1 1/2 cups whipping cream
3/4 cup strawberry puree 
1/2 can sweetened condensed milk


Mix cornstarch, sugar and salt in a saucepan. Add milk and half-and-half. Cook over medium heat, stirring constantly, until smooth and thick. (This takes a long time - be patient!)

With the egg yolks in a small bowl, slowly stir in at least 1/2 cup of the cream mixture (this keeps the eggs from scrambling in the hot custard). Slowly pour the egg mixture into the saucepan with the rest of the cream, stirring well. Cook 2-3 minutes more, stirring. 

While this finishes cooking, melt the chocolate chips in the microwave, about 30 seconds. (They don't have to be completely melted) 

Remove pan from heat and add butter, vanilla, and melted chocolate chips. Stir well to make sure chocolate is completely melted and mixed.

Pour half of the custard into each pie shell and put them in the refrigerator. 


While the chocolate custard is setting, make the strawberry cream.
Puree the strawberries in a blender or food processor until smooth. (It takes about 1 1/2 cups of berries to make 3/4 cup puree). 
Whip the whipping cream until stiff peaks form. Slowly fold in the strawberry puree and sweetened condensed milk. You can add a little more of the sweetened condensed milk if the strawberries are really tart - but don't add too much or it will overpower the strawberry flavor and make the cream runnier.


The strawberry cream will be about the consistency of yogurt (and feel free to eat it by the spoonful like yogurt! It's pretty tasty!)

Pour (or spoon) half of the strawberry cream on top of the chocolate layer in each pie. Put them back in the refrigerator to set up for at least 4 hours, or even overnight. The strawberry layer may be a bit runny - the longer it stays in the fridge the better!

Top with a chocolate covered strawberry and chocolate shavings, and serve!


Doesn't it look so scrumptious with that strawberry next to it? You can see though that the strawberry layer is starting to run a little bit... still delicious though!

So now here's my question: What should I do with the other half of a can of sweetened condensed milk?


Note: the chocolate custard layer is adapted from the Lion House Cream Pie recipe.


Update: I recently decided to start a separate blog for recipes and food/cooking tips. You can see this pie recipe and a whole lot more over at Modern Mommy's Kitchen!