Tuesday, November 29, 2011

upcycle an old sweatshirt - the final chapter

I finally finished the last new piece from my old sweatshirt!  The second slipper.  (Because what good is one slipper?)

Now that I'm done, what's left of my sweatshirt looks like it should be an old mop or something.


But the hat, mittens, and slippers are all great!  Check out my previous posts to find out how to make the hat or the mittens too.

I have to be honest and tell you up front that I'm still working out some of the bugs on the slipper pattern.  But they do fit, and they are wearable, and cute!  Just a few little glitches that I'm trying to fix.

What you'll need:

An old sweatshirt (or part of it)  (you could also just buy some fleece)
Coordinating thread
Fabric paint/ puff paint
Fabric markers (if you want to make the doggie face)
Paper and tracing paper/vellum to make the pattern pieces

Scissors
Sewing machine
Needle

1. First you'll need to trace the feet of person you're making the slippers for.

(My little monster didn't really like this part.  He doesn't really get the concept of sitting still.  So good luck!)

2. Use tracing paper/vellum to draw the two feet overlapped one on top of the other, then smooth out the shape - this will give you a more rounded shape so the slippers can be worn on either foot.

That's the inner-most line in the picture below.


3.  I wanted the slippers to be a little big so he'd have room to grow into them, so I made another line about 1/2" bigger all the way around.  Then I made the final outer line 1/2" from that one to allow for the seams.  That is the size of the final pattern piece for the sole of the slipper.

4.  Measure the length of the final pattern piece.  This measurement will be used as a base line (x) for determining the rest of the slipper measurements.  For my slipper, x = 6"

5. Next you need to make the pattern for the upper part of the slipper.
This is where it gets a little tricky and requires a little math (and a calculator if you're horrible at math like I am.)

The bottom part, where it will attach to the sole, is x + 1/2".  (So mine was 6 + 1/2" = 6.5")
The toe comes up about 1/2" no matter what size you're making (unless it's for an adult.  then you might want it a little bigger.)
The longest side, the part that goes up over the ankle, is 1.15x (Mine: 1.15 x 6 = 7")
The top, which will be the opening to put the foot in,  is 0.75x  (Mine 0.75 x 6 = 4.5")
Then come down the other side 0.75x (Mine 0.75 x 6 = 4.5")
Then just draw a diagonal line connecting from the toe to the last line.

And now the math is done!  

6.  Cut out your pieces!  I cut out two of the sole for each slipper just for added padding and durability.  You'll need two of the upper pieces for each slipper as well.


Hint: Cut out the upper pieces so that the stretch of the fabric goes in the direction of the length of the foot.  Then it will stretch better putting the slippers on and off.

For the next several steps, I'm only giving instructions for one slipper.  So don't get confused!  And don't forget to repeat and make the second slipper!  (Like I did for about a month... oops!)

7. Pin both sole pieces together, right side facing wrong side, so the soft fuzzy side will be on the inside of the slipper, and the "right" side will be on the bottom of the slipper.


8. Stitch the sole pieces together around the outside edge.


9. For each of the upper pieces of the slipper, fold the top down to meet the corner where the diagonal line begins.  This will make the finished "cuff" at the top.  Stitch it in place.

*If you want to add elastic, you can make a casing for it just above this stitch line.  This is where things got a bit tricky for me, and I'm still working on the best way to do this.  I tried a few things, and didn't love the way either of them worked, so when I come up with a really good way, I'll come edit this post!  Both ways technically worked... but were kind of a pain.  And I'm lazy.  So I'm working on the easiest way!

10. Pin right sides together of upper section of slipper, and stitch down both sides, leaving the top and bottom open.


11. With right sides together, pin the top portion to the sole of the slipper.  

I like to start with a pin at the toe and heel, and then kind of ease the rest in.  That tends to work best for the curves of the pieces.

12.  Stitch them together, and turn the slipper right side out!  


Technically, the slipper is done at this point!


13.  But, if you have exposed seams that bug you

Just use some cute bias tape to cover them up.  (I'm lazy and didn't really care.  Plus, these are just for my little man to wear around the house, and will probably be tucked up under his pant legs anyway.)  This is the other problem I'm working out with this pattern... 

14.  And if you want to make them look like little doggies, cut out four kind of rounded triangle pieces (for each slipper) for the ears.


15.  With right sides together, stitch them together around the edges, leaving the top open.  Turn them right side out.

*I actually did these wrong side out, because I liked the look of the slight contrast in the fabric.

16.  Hand stitch the tops of each ear shut, then stitch them in place on the slipper.

17.  Use a fabric marker to draw on a little nose and eyes.


18.  And to make the slippers have a little "tread," use the puff paint to make squiqqle lines, or any pattern you like, on the bottom.  It will keep them from slipping on slick floors!


19.  Repeat steps 7 - 18 for the other slipper, and you're done!


Now your little one will have warm little toes and look quite cute!  :)


Friday, November 25, 2011

Don't forget!

I hope you all had a wonderful Thanksgiving!  And haven't worn yourselves out with too much Black Friday shopping yet.  I just wanted to remind everyone about my Black Friday Sale!  All ornaments are 10% off today!

Here's a few of my favorites:

Snowman and penguin ornament - I love these little guys.  They just make me smile.  :)


And of course the reason for Christmas - the baby Jesus with the new star against the Bethlehem skyline.

The ornaments are all handmade and beautifully detailed.  To see more ornaments, go visit my shop, and spread the word on the sale!


Wednesday, November 23, 2011

A Thanksgiving Craft

I hope you're all getting excited for some deliciousness tomorrow!  I know I am.

So in the spirit of Thanksgiving, I have a fun little Thanksgiving/fall inspired craft.  They're Thanksgiving snowflakes!  Like the paper snowflakes you might make for winter or Christmas, but fall and Thanksgiving themed.


This fun leaf snowflake came from a book called Snowflakes for All Seasons, by Cindy Higham.  


But these other two came from me!  Which means you get a free printable pattern for them!  And step-by-step instructions to help you make them.

A quick tip:  I cut these ones out of construction paper because I wanted them to be on colored paper.  I don't really recommend construction paper because it's thick and harder to cut through all those layers.  But if you have patience and really good scissors (I have neither) construction paper will work.

Another tip:  Run your thumb nail over the crease after each fold to make it nice and tight.

For each snowflake you will need:
An 8.5" x 8.5" square paper
Scissors
The pattern

Step 1:
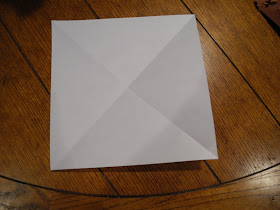
Fold your square in half into a triangle


Step 2:
Fold it in half again, into a smaller triangle

Step 3:
Fold it in thirds, so the two sides overlap

Step 4:
Cut off the little pieces that stick out over the bottom

Step 5:
Trace the pattern onto the triangle.  Now you're ready to cut!!


And here's your pattern!  Just click on the image below, then save/download it.  Then you can just print it and you're ready to go!

Happy Thanksgiving!


Tuesday, November 22, 2011

Black Friday Sale!!

I normally like to take my holidays one at a time.  You know, don't really start thinking about Christmas until after Thanksgiving.  But this year I've had to do at least a little Christmas prep pre-turkey to get ready for my Black Friday Sale!

All of the ornaments in the Christmas Ornaments section of my shop will be 10% off!!

And the best part?  You don't have to go wait in line at 3 in the morning and risk being trampled by a soccer mom desperate to get that weird looking Bratz doll, or whatever the "must have" toy is this year.  You can even do this shopping in your pajamas.

The sale will go for 24 hours - midnight to midnight.  So if you're a night owl, you can start your shopping before you go to bed!  (Or in your bed!)

Here's a little preview of some of the items that will be on sale.


Some ornaments I have more than one of, or can make more, but some are "limited edition," so be sure to check it out and take advantage of the 10% off sale price!

I will also be listing a few more ornaments in the next few days before the sale, so check the shop for new ornaments as well.  


And in the mean time, enjoy your turkey and pie!

Monday, November 21, 2011

upcycle an old sweatshirt - part 2

I recently found some old sweatshirts which I knew would never be worn again, and decided to put them to better use!  In part 1 I used the sleeves to make some mittens for my little boy (with not so little hands!)

Today is all about making a little beanie/baby hat out of the old sweatshirts.  It's great, because the fabric is already warm, soft, and stretchy!

So the first thing you'll need to do is figure out the size.  If you already have a similar hat, you can just measure that, and add some room for the seam allowances.  If not, then you'll have to measure the head of the person the hat is intended for.  

Once you have the head circumference, you'll want to divide it by 2.  So for example, if the head circumference is 18", then your magic number (we'll call it x) will be 9.  The circumference divided by two works because this gives you room for the seams, and then the fabric will stretch just a little over the head and keep it snugly in place.

I would also recommend measuring from just above the brow to the top of the head.  My first hat ended up a little too short because I kind of just eyeballed it... oops!  It kind of looks like a little sailor hat.

(And I promise my son doesn't always look like a zombie - he's watching Toy Story.  It's the only way I can get him to hold still long enough for a picture.)

So this hat was 9" across (remember, x=9), and only 5" tall.  I think a better ratio is to do about .66x tall (9 x .66 = 6)  You'll see hat #2 shortly, which fits much better.

So let's recap on the measurements:  

1. Measure the head circumference. 
2. Divide by 2 to find x.
3. x = the width of the pattern piece you will cut out
4. .66x = the height of the pattern piece you will cut out

And for those of you who hate math like I do, here are some pictures:

The pattern on the left is the good one.  The one on the right is the one used on the first hat that was too short.

Once you have your measurements, you'll need to make a pattern.  It's really pretty easy.  Use vellum or tracing paper if you have it, or just computer paper if you don't.

1. Measure out x length across the bottom of the paper.
2. Find the middle, then measure .66x up from that mid point on the base.
3. Draw a neat curve from the peak of the hat down to the brim.  You can use a large circular object to guide you if you're not confident in your own abilities.  But since you still have to sew it anyway, it doesn't have to be perfect.  To make it symmetrical, I like to draw out one side, then cut it out, fold it, and trace it on the other side.

Next you'll need to cut out your pattern pieces.

For the first hat I cut out the pieces vertically, which worked fine

But for the second, I cut them on an angle, because that was the direction the fabric was stretchiest.  So just give the sweatshirt a few tugs, and see which way it stretches most.  You'll want the base of the hat going the direction of the stretch, so it will stretch around the head.

You may also notice that both sweatshirts are missing the little stretch band at the bottom.  That's because I cut it off to use for the brim of the hats!  It works so well because it's nice and stretchy, and it's already a finished edge!  (I'm lazy like that.)
So go ahead and just cut the whole thing right off.  You can measure it out after it's cut.  You'll need approximately 2x (the head circumference).

Now you're ready to sew!

Pin the right sides of hat pieces together, and stitch around the curve with 3/8" seam allowance.

Now pin the right side of the brim piece (although really, either side could be the "right" side) to the wrong side of the hat.

Stitch the ends of the brim piece together to make a circle.

Stitch the brim onto the hat.

Turn it right side out, flip up the brim, and you're done!

  If you don't want to the brim to be able to fold back down, simply tack it in place with a few stitches.


You can add an appliqué or other decorations to the hat if you want, but it's ready to wear!  I'm contemplating adding some doggie ears and a little doggie face to this brown one.  Then it would match the little slippers I made from the sweatshirt that you'll get to see in part 3!

(Slightly less zombie-like in this picture.  Only slightly.  And this hat definitely fits better.)


Saturday, November 19, 2011

owie owls and friends

I hate to be one of those people that just follows the trends.  Or that professes to have loved something long before it got trendy, but in the case of owls, it's absolutely true!

Exhibit A:
My owl t-shirt that I've had for almost five years.  

Exhibit B:  (okay, more of an anecdote... but I wanted to keep the parallel structure.  I'm weird like that) When my husband and I were dating, about 4 1/2 years ago, we were walking through this park, and found a tiny little adorable owl.  I'd already liked owls before that (Harry Potter, duh!) but this little cutie sealed the deal.  In fact, we named him Seamus and decided he was our pet owl.  Sadly, we never actually saw him again, but we kept looking.  My husband even proposed to me at that same park, after supposedly going there to look for our dear Seamus.  

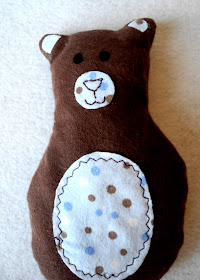
Anyway, on to the point of this post - the little "Owie Owls" I made.  They're hot/cold packs made out of super soft flannel to use on "owies."  I don't know about you, but in our house, when you need an ice pack, it invariably ends up being a bag of freezer burned peas.  This is a much better option!


Meet Seamus, my first Owie Owl.  I've got a few more I'm working on, in other colors/patterns - one is a super cute pink and turquoise argyle.  I'm in love with argyle.  But I haven't finished that one yet, so no pictures, sorry.

So in the interest of not appearing completely trendy, and for those who (sadly) may not like owls, I started on some other animals to be friends with my owie owls.  Meet  the Boo-boos:  Boo-boo Bears, Birdies, and Bunnies. (pictures of the bunnies coming soon)


Well, there you have it.  These little friends are a much better option than your frozen vegetables.  And if you don't need it for that, warm it up in the microwave for a warm little snuggle buddy.  That sounds really good to me today after the snow that fell all night long!


Wednesday, November 16, 2011

Thanksgiving Turkey Cookies

Turkey cookies have been a Thanksgiving tradition in my family for as long as I can remember.  We would set it up assembly line style so me and my sisters could all help out.  I always wanted to do the candy corns.


I've seen lots of turkey cookies, cupcakes, cake pops, etc. recently, and maybe I'm just biased, but I still like mine best for three reason:
1. I just think they're really cute!
2. They're delicious (unless you don't like candy corns like my husband.  lame.) and
3. They're super easy!  Lots of the other ones I've seen require actual skill with frosting - doing intricate little faces on the turkeys or feathers.  But these ones?  Even if you have the artistic abilities of a toothbrush, you should be able to handle these.  If my older sister can do it, anyone can!

So here's what you need to make these tasty turkey treats:
sugar cookies, chocolate frosting, Hershey kisses, red hots/cinnamon imperials, and candy corn.


Of course, you can make the sugar cookies and frosting from scratch, but if you're in a hurry, store bought works well too.  See what I mean about easy?  

My cookies turned out a little bigger and flatter than is ideal (stupid altitude), but that just means some of them have a little extra space for extra frosting.

Just frost your cookies, stick a kiss a little closer to one edge from the center, a red hot in front of it for the gobbler, and 5 candy corns behind it for the feathers.  Ta-da!


Much more delicious than actual turkey if you ask me.


My army of turkey cookies, waiting to be wrapped up and taken to neighbors.

Oh, one last tip: Sometimes it's hard to find candy corn after Halloween, so we stock up ahead of time with all the Halloween candy sales.  I know, it's too late for this year... but look in the candy aisle and hopefully you can still find some!

Happy almost Thanksgiving week!


Monday, November 14, 2011

upcycle an old sweatshirt - part 1

I recently found a box of old clothes from college, 90% of which I will never wear again.  I was about to throw them all in the "get rid of" box, when I realized several items could actually be reused.  My little guy needs some new hats and mittens for winter, and what better material than an old sweatshirt?  It's already warm and soft and stretchy!

So today I'm just going to write about making the mittens - I'll post about the hats and slippers later (probably whenever I get around to finishing them... hmm...)

Honestly, the hardest part of this whole project was getting my little monster to hold still enough to trace his hands.  So that's the first thing you have to do.

1. Trace the hands of the person you're making the mittens for.  (Just one hand will work if you can't get the other one traced too.)

I made two attempts - one with the fingers separated, outlining between each, the other more like a mitten.  (Please notice the scribbles and wrinkles in the paper.  He really doesn't like to hold still.)  Either way works, but be sure if you trace with the fingers separated, you make the pattern a little smaller than just outlining all the way around the fingers.

2. Use a piece of tracing paper or vellum (I always use vellum because it's a bit stronger and works really well as a pattern piece) and trace around the hand in the shape of a mitten to get the approximate size and shape you need the finished mitten to be.


3. Add about 1/2" around the mitten shape you just drew to allow for the seams.  This will also leave a little growing room too, since your seams won't be quite 1/2".  Then cut out your pattern piece.  (The picture above shows the cut out pattern piece over the original hand tracing.)

4. Line up your pattern piece at the bottom of one of the sweatshirt sleeves so that the wrist of the mitten lines up with the cuff seam of the sleeve - this lets you use the already finished cuff as the bottom of the mitten.  It makes it easy (no hemming! I'm super lazy) and it's already stretchy to fit over the hand, and hold around the wrist.  Trace your pattern with an erasable fabric marker.

(See how the base of the hand lines up with seam of the sweatshirt?)

5. Pin around your traced mitten to hold both layers of fabric in place, and cut out both pieces.

6. Now re-pin the two pieces together, this time with right sides together.

7. Stitch around the outside of the mitten, making sure to leave the bottom open!  (I stitched mine with 1/4" seams to leave a little room to grow)

8. Turn it right side out, and you're done!  If the unfinished edges inside the mitten bother you, you can use bias tape to finish them.  But like I said, I'm lazy, so I left mine.  Plus, the mittens are pretty long on my boy and tuck up under his sleeves anyway - which is actually really nice!  It helps them stay on even better.


9. Repeat steps 4-8 for the other mitten, of course.

I'll post about the cute hat (also made from the sweatshirt) soon!